| NOTICE: Do not
attempt any work inside the control box unless you are trained on
working with live electricity. If you are not adept at working on
live circuits then do not make any live power on adjustments. ALWAYS TURN OFF THE POWER TO THE SPA BEFORE YOU PLACE YOUR HANDS INSIDE THE CONTROL BOX. This information is for people who are trained in electric repairs. Before any Pressure switch adjusting or replacing, Check the filters first. Even white filters can be clogged with calcium. Never use any LIQUID pH balancers, such as pH Perfect, or pH Balance or any brand or version of this liquid balancer. It deposits calcium on the filters and basically ruins them as well as the jets, heater, and all the parts of the spa will be covered in calcium. Calcium is what holds concrete together, it is the binder for concrete. The flow/pressure switch is a device that checks for pressure in the heater tube so that we know there is water flow. If there is no water flow we do not want to run the heater. If the flow/pressure switch is not functioning normally, you will see the error code "FLO", "FLC" or "three dots flashing" below the digital temperature read out. FLO or three dots flahing means the swithc failed to turn on. FLC means the switch was already on all the time. Either way the spa will not heat. If you have three dots flashing AND a tiny red light on the board is lit, then it is a "heater High Limit" sensor problem. You need to establish normal water flow first! Before testing this switch make sure the water level is high above the skimmer so that no air can be drawn into the filter(s). Check visually to see if the water is running normally out of the smaller circulation jets on an SE or SC spa and make sure that there is no debris inside the pump. If you have taken the filters out and not turned off the spa, you may have leaves, twigs, or any debris in the "wet end" of the filter pump. This debris will partially block the water flow and reduce the flow so much that the pressure switch will not come on. In this case you need to open up the front of the pump and remove the debris. Undo the union and slide it over to get access to the impeller. Use your fingers to pull out the debris. The pressure switch is for safety, and you need the full flow from the pump to keep from overheating the heater and the pressure switch is actually doing a good job of protecting the spa from overheat. On Haven Spas the pressure/flow switch is located inside of and on the lower right side of the equipment control box. It is screwed into the top of the bright metal, stainless steel heater housing. It looks like the photo below. It is basically a rubber diaphragm with a spring load that turns on a switch when there is enough pressure. There is an adjustment to the flow switch which is a slotted piece in the vertical cylindrical adjustment. A screwdriver fits in that slot. If you turn it clockwise it tightens the spring tension and the pump needs more pressure to turn on the switch. If you turn it counter clockwise it reduces the pressure required to turn on the switch. The idea is when the heater pump is "on" the pressure switch is "on" and when the heater pump is "off" the pressure switch is "off". As the switch ages the spring tension may become weaker and in need of adjustment. Adjusting the pressure switch is a normal maintenance. If the pressure swithc is on all the time, it is an FLC or locked pressure switch. The clockwise method to tighten the spring tension is needed. See below. 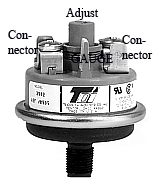 If the filters are dirty, the pump has debris or there are any restrictions like a "Magic" valve partially closed the pressure switch will remain off and give you the three dots flashing or "FLO" on older models. The heater will not work in this condition. You can get debris such as leaves and twigs in your pump if you remove the filters and there are leaves floating in the spa. In this case you will need to open the pump and physically remove the debris with your fingers. The debris can be sucked into the heat pump, and can actually cover the hole in the bottom of the pressure switch. This debris will reduce the "flow" to the heater and reduce the pressure. To test for dirty filters, simply remove them and see if the error code goes away but don't allow any debris to be drawn into the pump. The first thing is to insure the filter heater pump is running normally and all the water flow appears to be normal. Note: On the SE and SC spas also check to make sure the circulation pump is hooked to the correct connection on the circuit board. Follow the leads from the circulation pump receptacle to the circuit board. It will say "CP" Or "Circ Pump" on the "BLACK WIRE" connector. The way to tell if the circ pump is not wired correctly is to unplug the circulation pump, unplug and remove the leads from the side of the control box momentarily, and plug them back in. The error code will go away. The reason for the error code is that if the pump is not plugged into the proper receptacle, is because the circuit board has to be fully "booted up" before the circ pump starts. If the pump is running before the circuit board is fully booted up, it will indicate that the flow switch is already on before the board is on. This is telling the board that the flow switch is locked in the on position. The circulation pump must come on after the circuitry is fully on. There should always be a time delay when you turn on power, before the circ pump starts. If the heater circulation pump is connected correctly then do the following tests: Turn the power off by switching off the breaker or pull the disconnect. Then disconnect the leads from the pressure switch for this test. Wiggle and lift the connectors off. You will need a continuity tester for this test. If you place a continuity meter across the spade connectors of the pressure switch while the pump is running, it should show a closed switch. Unplug the jet pump and the pressure will drop and the switch will show an open, or no connection. A simple low voltage light tester will work. If the switch does not operate so it goes off with the pump unplugged or will not go on with the pressure applied and adjusted, then the pressure switch is defective. DO THIS WITH THE POWER TURNED OFF. Turn it back on after each adjustment. The pressure switch is in need of adjustment, if it stays on when the pump is off. Tighten the switch spring clockwise. If it stays off when the pump is on, then the pressure switch needs to be adjusted counter clockwise to reduce the tension on the spring. Do 1/4 of a turn or 90 degrees on each adjustment until the switch works properly. You adjust the pressure switch by turning the small vertical cylindrical adjustment with the slot for a screwdriver. Do this with the POWER TURNED OFF. Again, "Clockwise" tightens the spring and allows the pressure switch to turn off when the pump is off.. "Counter clockwise" reduces the spring tension and allows the switch to come on with proper water pressure. The normal setting on the switch is about 1 LB to 2 LB. This is shown on the white "GAUGE" tag next to the adjustment piece. The top edge of the piece is the point where it should line up. If the pressure switch is on when the pump is on and off when the pump is off (correct function), and you still get three dots flashing, then it may be a connection on the circuit board. If you trace the leads from the pressure switch, you will see a small red connector. Sometimes just taking the connector off gently, and putting it back on will cause a good connection. The final test is to see if the circuit board is responding to the leads. By jumpering between the pressure switch leads, causing a false "ON" the three dots will go away and the heater light on the front of the control box will light up, as long as the temp setting is calling for heat. When you disconnect those leads, you will get three dots flashing. ONLY DO THIS IF THE PUMP IS RUNNING NORMALLY. Wear rubber or leather gloves anytime you are near live power. You can use insulated long nose pliers for this as well. Any Questions, EMAIL service@spaspecialist.com |
|
| BACK
to INDEX |