|
Spas and
Hot Tubs Installation Information
In-Ground

copyright 1997 through 2021 Havenmade , Broomfield /
Denver Colorado
If you are still in the planning stage, I urge you to
first read these information articles on picking a good
product.
http://www.spaspecialist.com/shopping.html
http://www.spaspecialist.com/qa.html
http://www.spaspecialist.com/FullFoamVSThermallySealed.html
Spa newsletter. Learn facts and information on hot tubs
and spa care, and helpful hints to save you money and
enhance your spa ownership.
published on the web by
Havenmade Inc.
Broomfield, CO
(720)-282-4692
Contact Us
You may down-load this information for your personal
use. Duplicating or publishing any part of this document
for commercial use, without written permission, is
strictly prohibited.
Installing A Portable Spa
Part III
Installing an energy
efficient spa hot tub in the ground.
No matter what is written here, the final authority on
construction is your local building officials.
Many people want their hot tub down in the ground,
sort of like a natural hot spring.
There are several problems with the old standard way
of installing spas in the ground. That is why I do not
recommend it.
The old way is to dig a hole in the ground, place
the plumbed shell (with a layer of foam) directly in the
hole, and back-fill it with sand.
The problems with it are lack of energy efficiency,
and extremely difficult plumbing repairs. The spa tends
to float out of the ground after a few years. This style
of spa is usually a custom made hot tub, and is much
more expensive per feature than a factory made portable
spa. Basically, a badly designed ( as most are)
in-ground spa is just an expensive to own, and very
difficult to repair idea.
Because of the moisture in the ground, eventually the
(insulation) foam becomes wet, and is useless for
insulation. The heat gets rapidly drawn out of the spa
hot tub vessel.
Any plumbing problems require that the spa hot
tub, be extracted from the ground and this is an
all day job for two or three people.About $3000-$5000
just to get it out of the ground fix it and put it back
in the ground.
The best way, that I know of, is to install the spa
hot tub in a well engineered vault. This is simply an
underground room that is easy to build. It does require
a little extra digging and some basic concrete,
plumbing, and masonry skills.
You have to plan for drainage inside the vault,
similar to the drainage system used in basements.
The procedure goes like this:
1/ Dig out a vaulted room in the ground, make it at
least six inches deeper than the height required for the
hot tub, (this is for the thickness of the concrete
floor), and at least 48 inches bigger than the sides of
the hot tub. If you have a 91 inches by 91 inches by 38
inches high spa,the hole would be 139 inches by 139
inches by 44 inches deep, figuring on a six inch acrylic
rise out of the ground with a six inch concrete
floor. The thickness of the concrete or block on
the wall needs to be added to finish at 24 inches all
the way around. There are variations on this, so consult
us or a local engineer for any problems with
space. If you get a lot of rain, you may
need to have a rock base under the concrete for drainage
under the tub (a "French drain").
2/ Dig out and install the drainage system, either
attach it to the house sewer system (if above the sewer
level), or create a drainage system similar to the
leaching field used in septic systems. You may need to
put in a plastic drainage bucket in one corner and a
submersible pump to catch the water and pump it out (
easiest to do). You will need some expert help
designing it. Call your building department. Different
soils require different length of piping and different
sizes of pipe and different leach field requirements.
The point is to never allow water to build up inside the
vault. Put the plumbing for the drain in the corner of
the vault. I recommend that the center be
perfectly flat where the hot tub sits, and the perimeter
24 inches be sloped into the drain. The drain can
be a plastic 10-20 gallon bucket with an automatic sump
pump (the simplest and easiest to do). If you have
a French drain system then you need a regular basement
plastic sump area with holes in the sides for the French
Drain pipes to enter the water caught under the spa.
3/ Dig out for the electrical to be installed, either
under the hot tub or just outside the spa perimeter.
Install the conduit, just above the level of the floor
about 6 inches. All conduit must be water proof for
underground service.
4/ Place a retaining wall made from concrete
reinforced blocks (cinder blocks). Use rebar inside the
blocks tied to the floor. Because the blocks are 8
inches thick, the room now is 139 inches square. This is
48 inches bigger than the outside of the spa. This
allows 24 inches all around the hot tub for access to
the equipment and plumbing. This is the best for
working on the hot tub and or moving the spa in and out
without a crane. It can be ramped into the
hole. If the hole is too small, you will still
have to raise the spa for any service to the sides with
space limitations.
5/ Using the retaining wall as a concrete form, mark
the exact depth of the floor concrete on the wall all
the way around the room. Use a laser level or a transit
or a hose level to get it perfect. The floor must be
level in the center, 91 inches square for a Fallsburg or
Timberlake, or Fallriver, as an example.
6/ Place the drain in position about 2 inches below
the level of the hot tub's level floor.
7/ Install a string layout the exact size of the spa
at the exact level of the floor, using the concrete wall
with anchors to hold the string. Make the spa
platform flat and level.
8/ Pour the concrete starting in the center making the
area of the spa perfectly level, and the area outside
the hot tub run into the drain, with a 1/4 inch per foot
run-off. (If necessary make two forms and pour in two
concrete sections. One form for the spa area in the
center, and another for the drain area.
9/ After the concrete is cured, place the hot
tub in the vault and have your electricity hooked
up. A crane or boom truck works well for lowering the
hot tub in place if the space does not allow.
10/ Now build a removable ground level floor decking
out of pressure treated and redwood or composite deck
boards. (I have a CAD drawing available for you.) If you
want a planted area around the hot tub's top, you
use a 6 inch planters with a plastic liner and place it
on a six inch lower decking. Make sure the decking can
support the dirt. You can be creative with this. It is
very important to make it so the planters can be lifted
out without harming the plants.
Make an easily accessible door for access to the
equipment side of the hot tub. (My drawing makes all
sides easy access.)
11/ If the spa is a high performance model, such
as (any of our Haven Spas) the Vista, SE or Paramount,
or SC you need to have air ducted into the space.
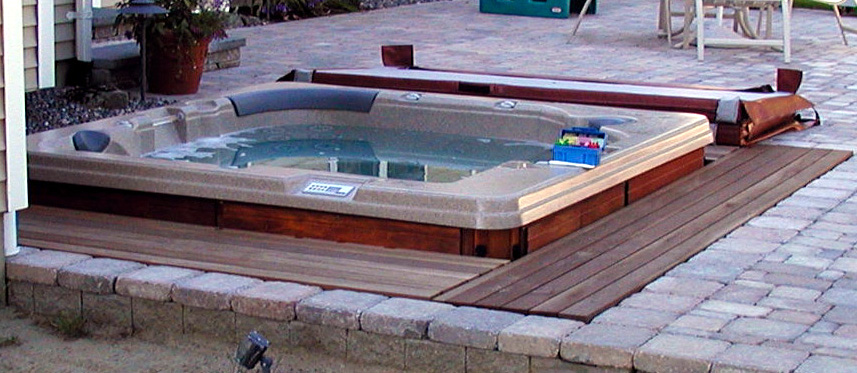
If there is decking as in the photo, just the 1/4 inch
spaces between the deck board is enough air.
By installing your spa this way, you will have a very
efficient and much easier to live with spa. If the spa
ever has a problem it can be repaired with ease, (lift
out a few boards and full access) and without the
tremendous effort of the old style. The spa will
have more efficiency than an above the ground spa. The
vault creates another level of insulation, and keeps
water off the spas insulation. This is the best value
for in-ground hot tub installation I know of. The
cover is also much easier to deal with.
If you have questions about anything dealing with spas
or any information on hot tubs contact us. We offer the
best spas for any cold climate (or anywhere) Don't
forget to order our 60 page e-booklet "How Spas are
Made". It's $9.95 E-Book only. You shouldn't buy a
spa without reading it!
Havenmade Inc.
Broomfield, Colorado.
(720)-282-4692
Next month; "Why water
flow controls are a bad idea"
Return to Home
Back to Spa Care Tips Index
page
HOME
In Broomfield
Colorado, Haven Hot Tubs are everywhere. We
are extremely popular in the Denver Coloraodo
area.. There are a lot of smart shoppers who don't
want to waste money in Colorado. If you live
in Broomfield or the Denver Colorado area, you are
lucky to have our facilities so close by.
|